# Mi Ads User Manual
Mi Ads is Xiaomi's international ad placement system. Built upon the Xiaomi Operating System, it consolidates the official ad platforms for products like GetApps, Mi Video, Mi Browser, Mi Music, etc. It features a rich variety of ad types, auto ad placement, and performance branding through big data algorithms to help you efficiently hit your sales and promotion targets.(Website: http://global.e.mi.com/)
# 1. Registration and Account Creation
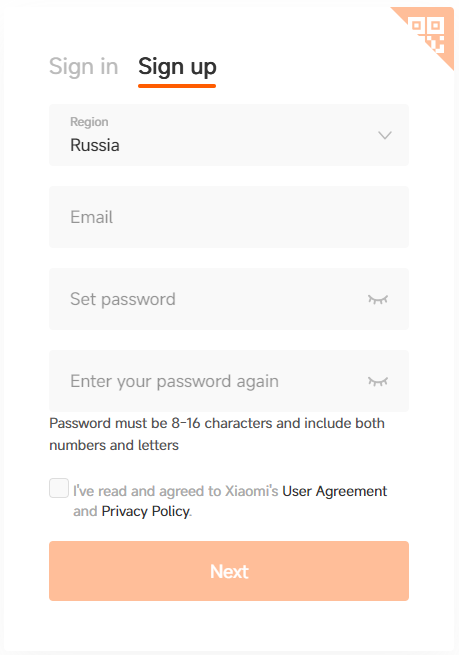
# 1.1 Sign Up/Sign In to a Xiaomi Account
- Enter the Mi Ads website http://global.e.mi.com/, then click "Get Start" at the top to sign in/sign up for a Xiaomi Account. We recommend registering with your company's public email address in case of account transfer in the future.
Note: Currently, Mainland China IP only supports mobile phone number registration.
# 1.2. Register a Mi Ads account
# 1.2.1 Sign Up for an Advertiser Account
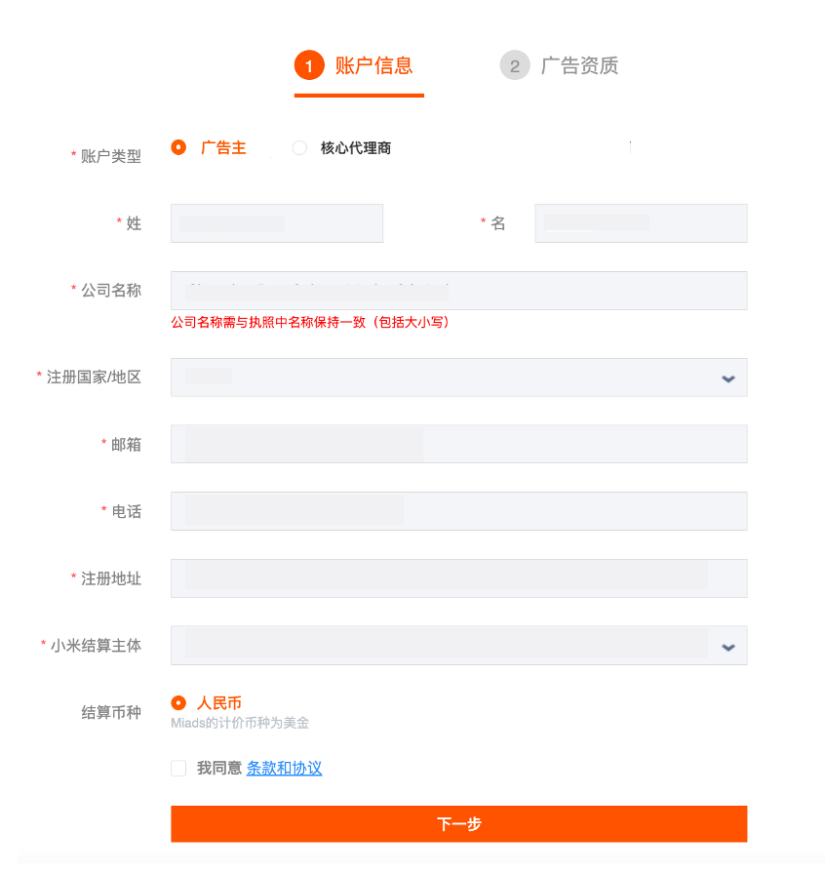
Sign into your Xiaomi Account to register a Mi Ads platform account.Advertiser Account Registration Process:
- Select advertiser as the account type
- Enter your company and contact information, and select the settlement entity
Country/region | Xiaomi Entity | Settlement Currency | Corresponding Contract Version |
Indonesia | Xiaomi Singapore | USD only | Xiaomi Singapore ID version |
Russia | Hong Kong iValley | USD only | RU version |
India | Xiaomi India | INR only | IN universal version |
Mainland China | Xiaomi Singapore | RMB only | Xiaomi Singapore universal version |
Other countries/regions | Xiaomi Singapore | USD, RMB | Xiaomi Singapore universal version |
Xiaomi India | USD, INR | IN universal version |
- Ticking the "I've read and agreed" box for the online agreement means that you fully understand and accept all terms under the agreement
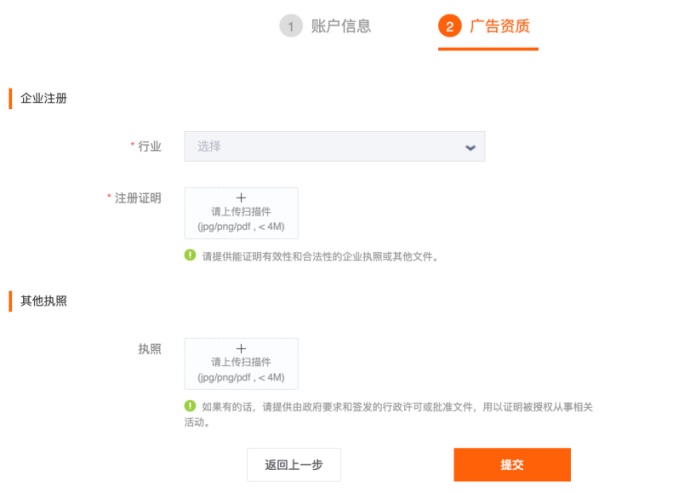
- Upload enterprise qualifications and submit for review
Note: For the field "registered company name", if your company name contains parentheses, please double-check if you have correctly entered half-width or full-width parentheses. The company name your enter must be exactly the same as that on your business license, including matching capitalization and punctuations.
# 1.2.2. Sign Up for a Core Agency Account
- The steps for creating a core agency account are the same as those for creating an advertiser account -- just make sure to select "core agency" as the account type. Under a core agency account, you may create multiple secondary agent accounts for multiple companies. It also serves as a hub for you to manage and distribute them. Under a secondary agent account, you may create multiple AA accounts for multiple companies. It also serves as a hub for you to manage and distribute them.
- The account information page is handled in the same way as when you sign up for an advertiser account. In the advertising qualification page, the core agency will need to upload a screenshot of the shop details page on the "company registration proof" field. If the app to be promoted is listed only on GetApps, and that you are unable to get the screenshot due to being blocked by special reasons, contact the corresponding sales and AM.
# 1.3 Account Review
- We would review the account in one working day once you have completed the sign up. The result will show on the account information page, and will also be sent to your contact email.
- If you have failed the review, edit the content on the information page and try again. If you have passed the review, it means that the sign up is done -- you may top up and start distributing ads.
# 1.4 Edit Account Information
- Once you have completed the sign up, you will gain access to the start page. When you need to edit your account information, you may click on the right of the navigation bar to access the account information page to do so. Editing account information will cause the account enter review.
Note: When an account is under review, its ad distribution will be affected. Please take careful consideration before editing account information.
# 1.5. Top Up
# 1.5.1. Advertiser Accounts
The corresponding AMs will make top ups automatically
# 1.5.2. Agency Account
- For prepayment contracts, the agency will have to first pay to the corresponding Xiaomi Account, then email the corresponding sales and AM; the email should include POP, the account to be topped, the amount to be topped, and the payment record. Top up staffs will then make the top up in one working day, and you should see your account balance go up accordingly.
- For post-payment contracts, the agency will have to email the corresponding sales and AM; the email should include POP, the account to be topped, and the amount to be topped. Top up staffs will then make the top up in one working day. When it is due for settlement, the actual amount spent by the account will have to be settled.
Note: To ensure smooth ad distribution, you should ensure that you have enough in your account balance, and that you send top up emails ahead of time.
# 2. Overview
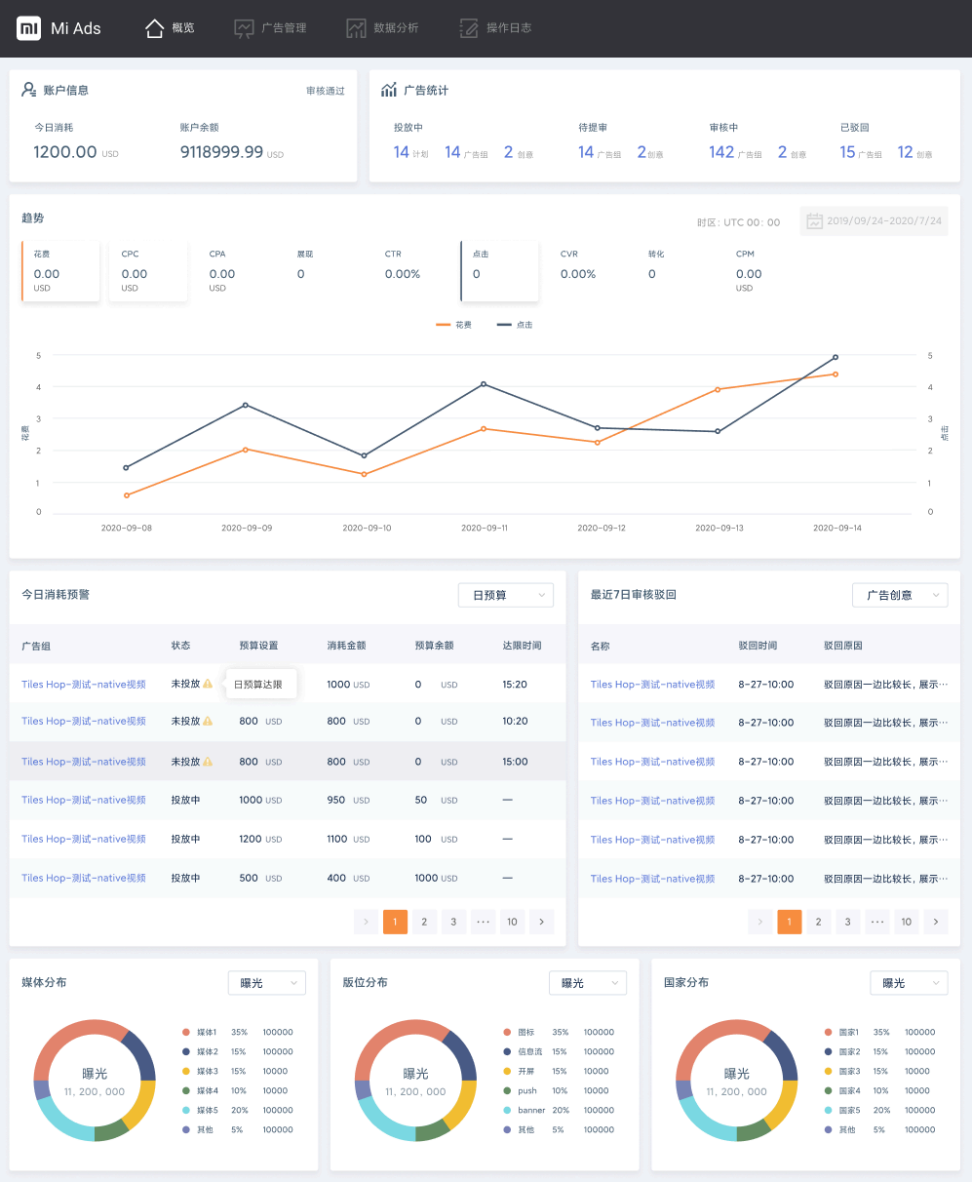
The start page shows an overview of your account, including balance, ad statistics, media review, rejection history, real-time cost, ad distribution, circulation trends, etc.
# 3. Advertising Management
The Advertising Management module can create campaigns (ad groups/creatives), conduct searching and filtering of campaigns (ad groups/creatives), batch operations, custom arrangements, and other functions.
# 3.1 Campaigns Creation (Ad Groups/Creatives)
Ad levels: campaign - ad group - ad creative
Note: Your campaigns should (when applicable) follow all policy documents provided by Mi Ads (http://global.e.mi.com/), all written agreements between you and Mi Ads, all applicable laws and regulations, etc.
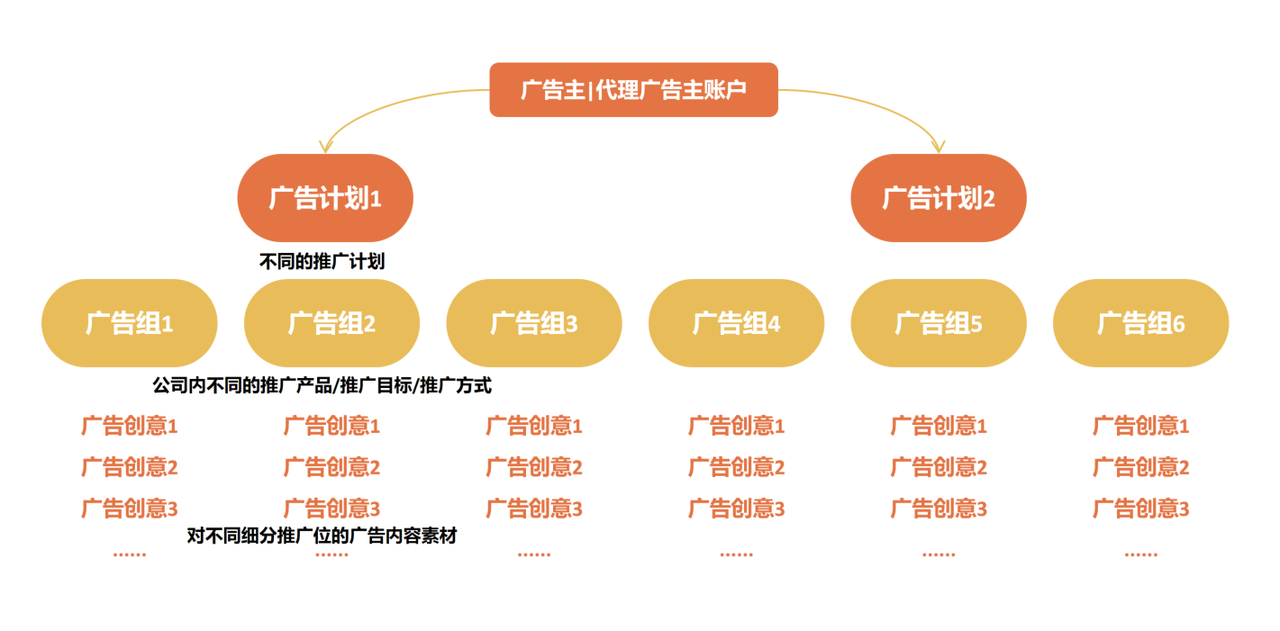
# 3.1.1. Normal Creation
# 3.1.1.1. Campaign Creation
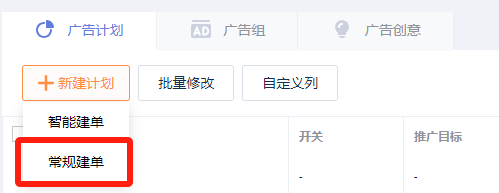
- Click "Normal Order Creation"
- Set up the campaign
① Set campaign type, i.e. for performance or for branding. For performance campaigns, you will have to specify a daily budget -- you may set an amount, or set no limit.
② Enter the campaign name
③ Set promotion goal, i.e. app download, H5 distribution, or remarketing
Tips: If your goal is to gain new users, select app download; if it is H5/website distribution, select H5 distribution; if it is to gain active users, select remarketing.
# 3.1.1.2. Ad Group Creation
The Mi Ads platform allows for a great number of advertising types and crowd targeting to help you accurately target your desired audience.

- Set marketing objectives, i.e. performance/brand
- Set up the ad group
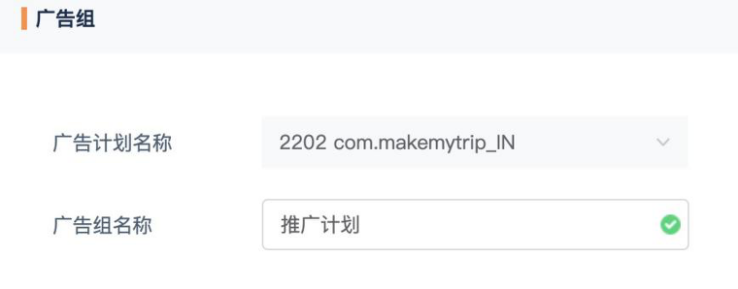
① Select the corresponding campaign name
② Enter the ad group name
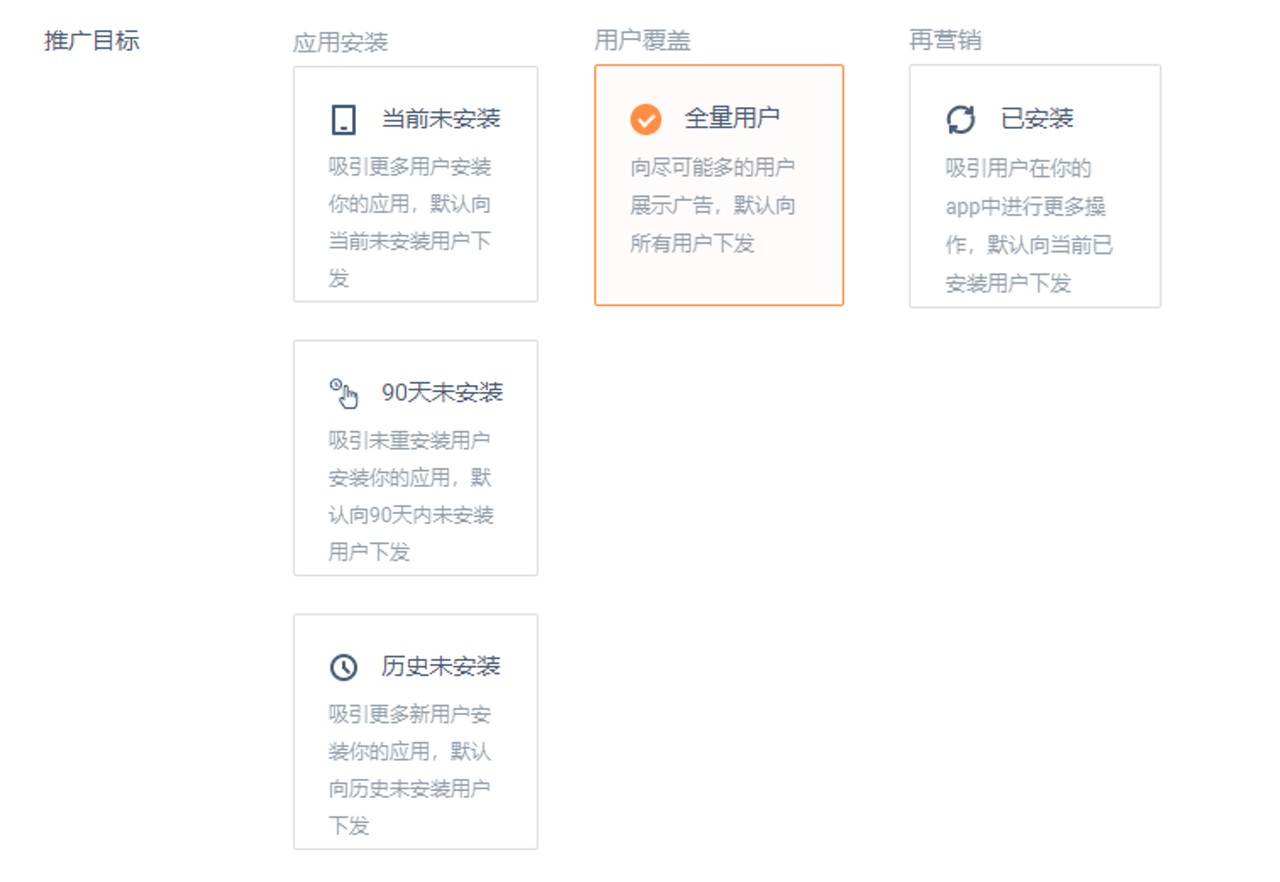
- Set promotion target
① Select the product to be promoted, i.e. Getapps or Google Play
① Select the product to be promoted, i.e. Getapps or Google PlayFor more details about listing apps on GetApps, please sign in to the GetApps developer platform Mi Developer (opens a new window)

② Select target groups that match the promotion goal
App installation:
Not installed: Attract more users to install your app. By default, the ad will be displayed to users who have not installed your app.
Not installed within 90 days: Attract users who have not re-installed your app to install it by distributing to users who have not installed it within 90 days by default
Never installed: Attract more new users to install your app by distributing to users who do not currently have the app installed
H5 distribution:
- All users: Display ads to as many users as possible by distributing them to all users by default
Remarketing:
- Already installed: Attract users to use your app more by distributing to users who have already installed the app by default
Determine placement
- ① Select placement
- Preferred placement: The system will auto-pick quality placements for you
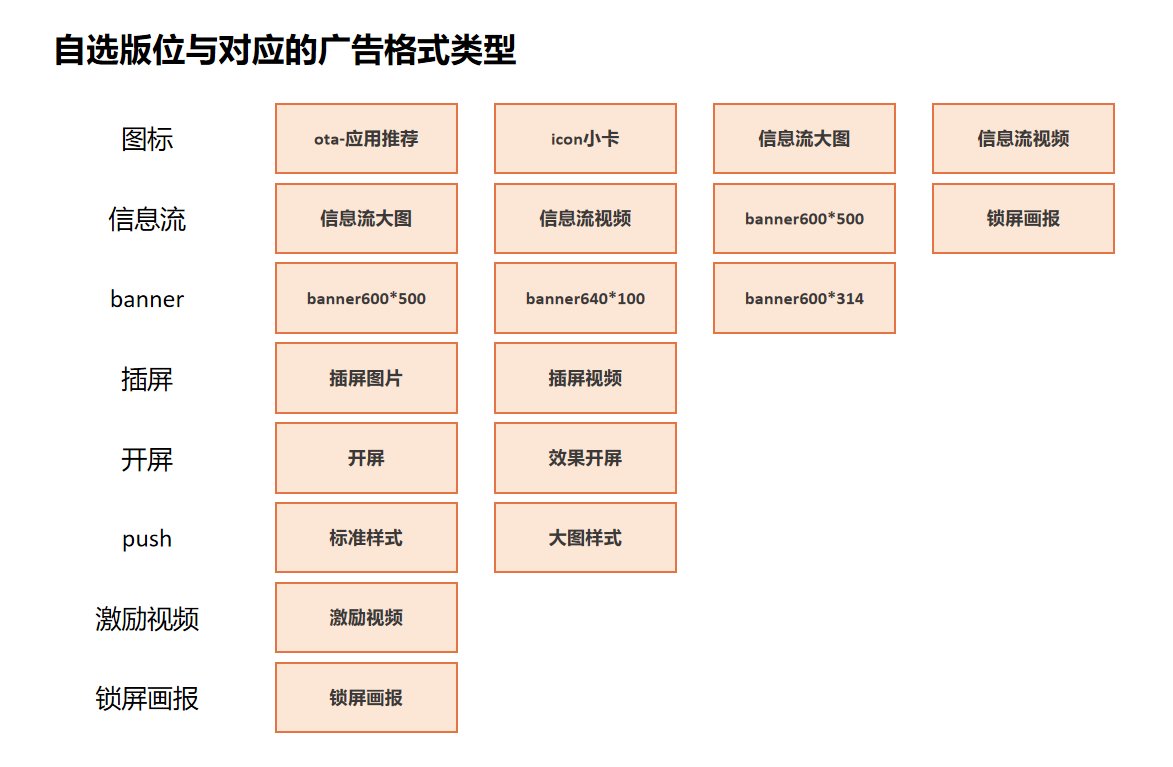
- Custom placement: PUSH, icon, wallpaper carousel, information stream, banner, interstitial ad, reward video, splash ad

After selecting a placement, you can view the placement example on the right side
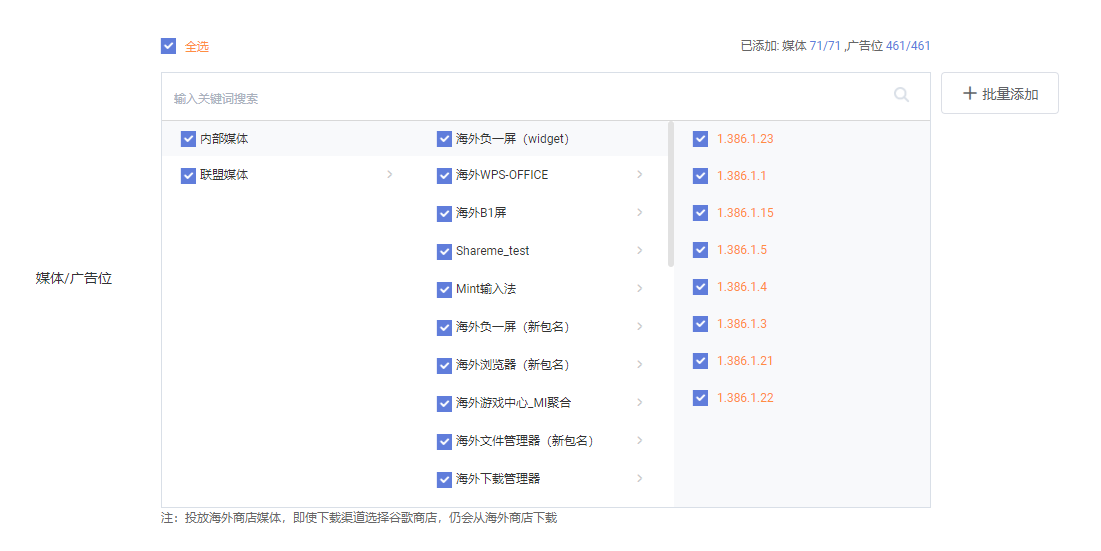
② Select media/ad placement. Different placement supports different media/ad placements. Preferred placements are quality placements auto-picked by the system -- you may pick what media/ad placements to hide. For custom placement, you may pick what media/ad placements to distribute.
- Set orientation
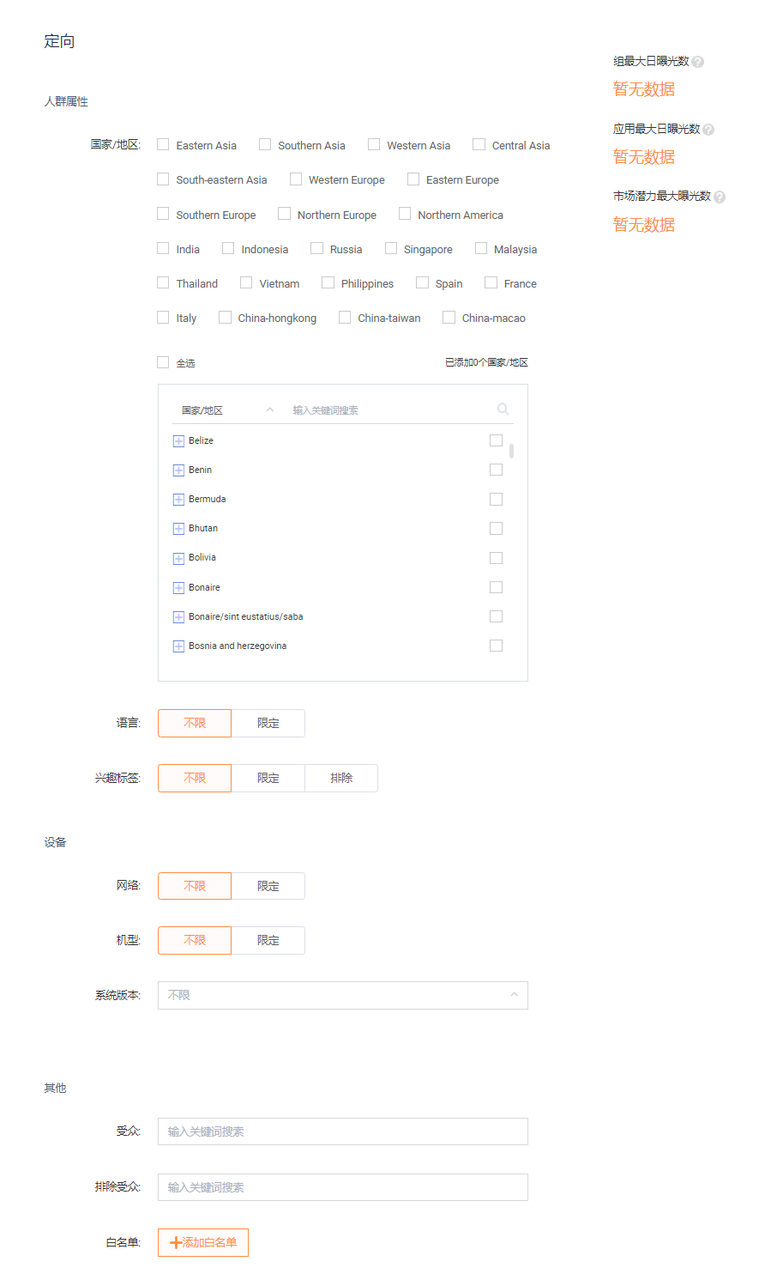
① User type: Country/region, language, interest tags
② Device: Network/carrier/model/system version
③ Others: Audience, excluded audience, whitelist
After setup, you may check on the right the estimated ad group max daily impressions, app max daily impressions, and market potential max daily impressions
Ad group max daily impressions: This estimates the max impression magnitude under specific orientation conditions
App max daily impressions: This estimates the max daily impressions for the app under specific orientation conditions
Market potential max daily impressions: Based on the package name's market share, this estimates the max impressions for ad groups that matches your orientation filters. Note that this is for reference only -- actual reach will be affected by the market situation
Set budget and schedule
① Time zone: UTC+0, UTC+1 ~ UTC+12:00, UTC-1 ~ UTC−12:00
② Time: Custom time period, or don't set end time
③ Time period: all-day distribution, or time-based distribution
④Total budget: Set the total budget
⑤ Daily budget: Set the daily budget
- Set bid
Performance ad billing method: oCPC (billed by optimized clicks), CPC (billed by clicks), CPA (billed by activations)
# 3.1.1.3. Creative Creation

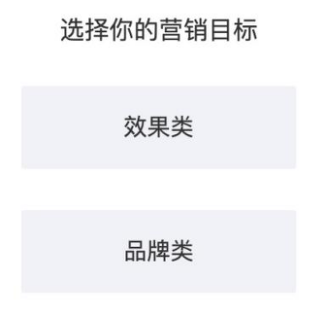
- Set marketing objectives, i.e. performance/brand
- Set ad creative
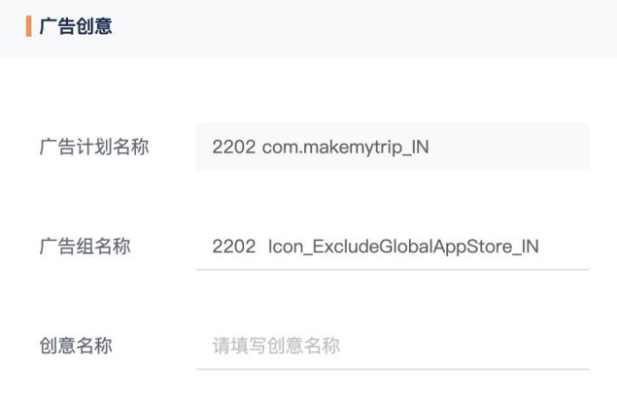
① Select the corresponding campaign name
② Select the corresponding ad group name
③ Enter the creative name
- Select ad format. The placements under custom placement have different, corresponding ad formats. You may select multiple formats and batch upload media for each placement. For preferred placement, you may batch upload multiple standardized ad materials.
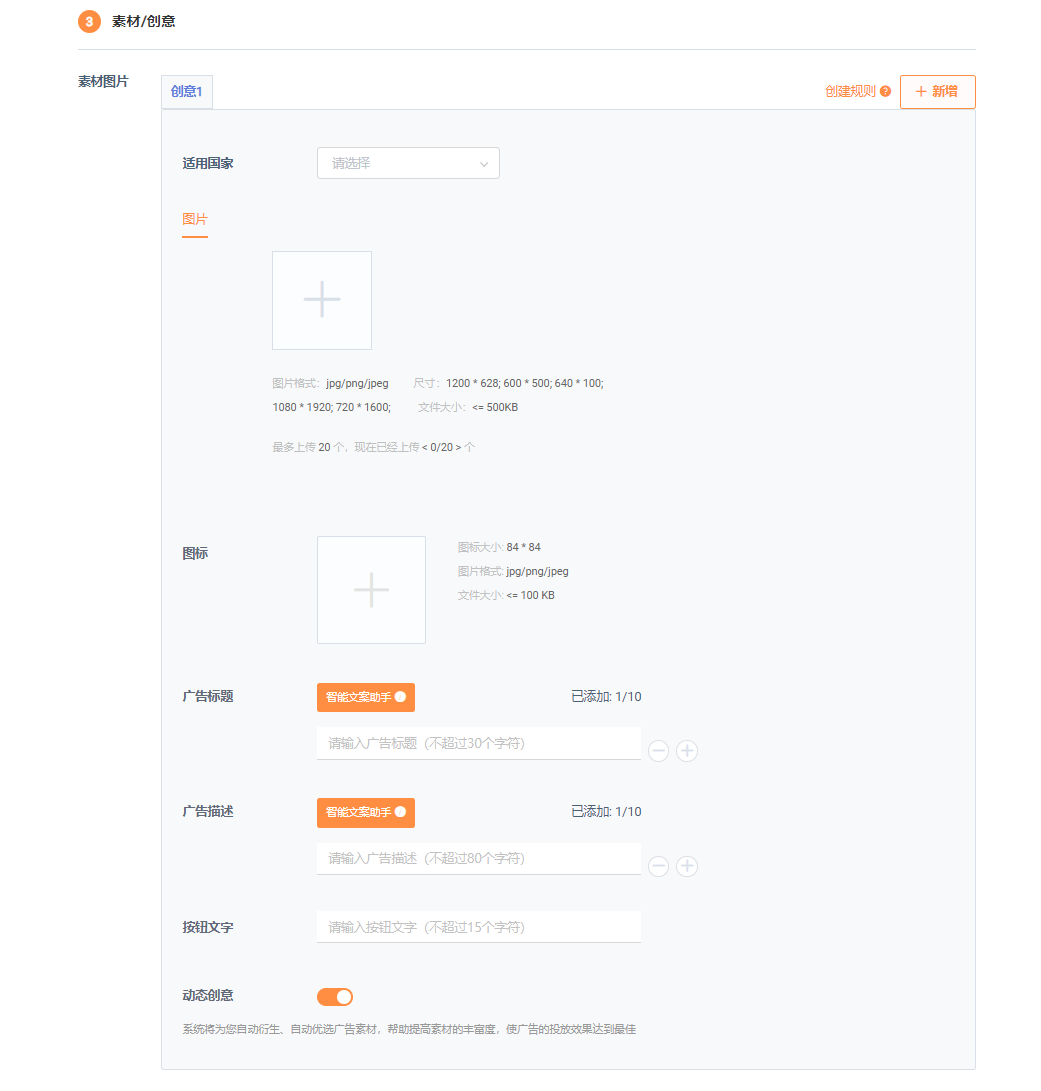
- Upload ad material information
Ad materials correspond to ad formats. Different ad formats have different material requirements.
Ad format standards can be found in Mi Ads Advertisement Format Standards.
After you upload multiple sets of creative media, the system will automatically create a high quality combination of your creative media according to your audience and ad placement, and select various components of the ad (images, videos, text, and action-oriented text, etc.) to generate different creative solutions to achieve the best distribution effect.
⑤ Real-time ad preview function
-After adding material information, you can preview the ad effect on the right side.The preview is for your reference only. The actual user interface may vary due to factors such as their device or language.
- Upload address and monitoring information
① Click address: The landing page address, the URL that users are directed to after clicking the ad (required)
② Deeplink: The in-app page URL that the user is directed to after clicking the ad (optional)
③ Impressions monitoring: After the ad is released, you can enter the impression attribution URL of the third parties to get more conversions (optional)
④ Video impressions monitoring: The video playing track URL of starting playing, playing to 1/4, 1/2, and 3/4 (optional)
# 3.1.2. Smart Creation
Note: Smart creation currently only supports performance ad preferred placements.
# 3.1.2.1. Enter Basic Information
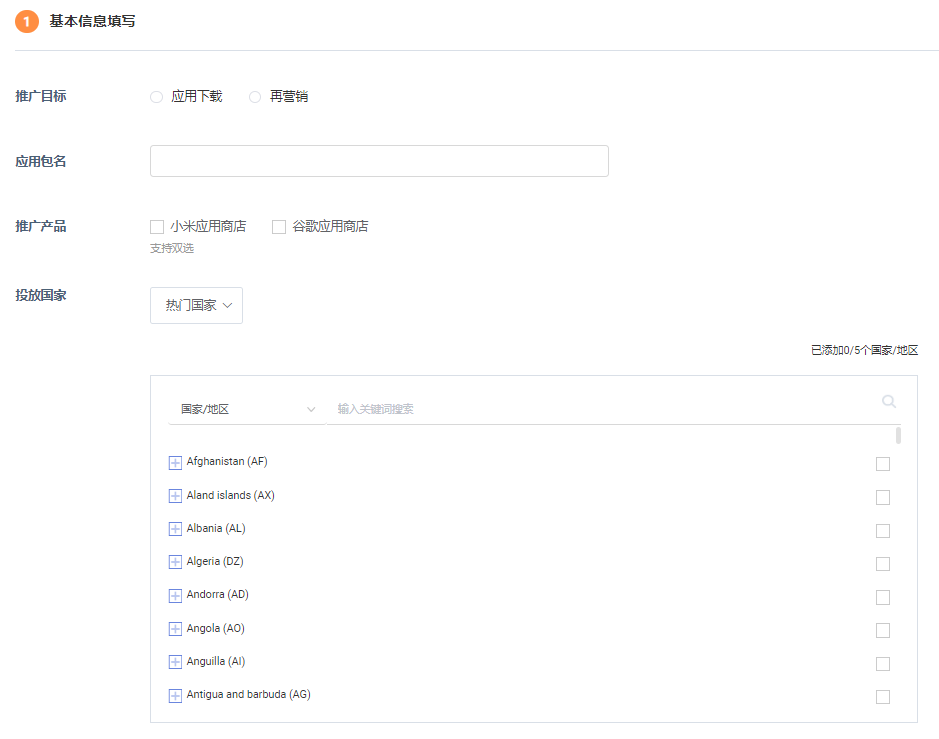
Select promotion goal, i.e. app download/remarketing
Tips: If your promotion goal is app download/to gain new users, select app download. If your promotion target is to gain active users, select remarketing.
Select the promotion channel, i.e. GetApps/Google Play Store
- If the download channel is GetApps, please ensure that the app is normally available on GetApps. For more details about listing apps on GetApps, please sign in to the GetApps developer platform Mi Developer (opens a new window)
# 3.1.2.2. Bid/Budget
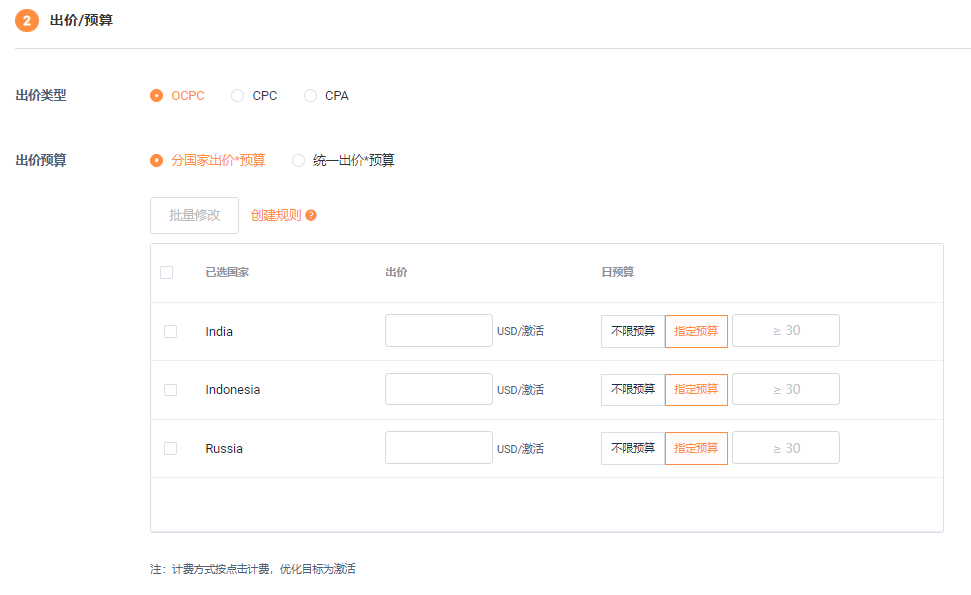
Select bid type: oCPC (billed by optimized clicks), CPC (billed by clicks), CPA (billed by activations)
You may set different bids and daily budget for each country you have selected.
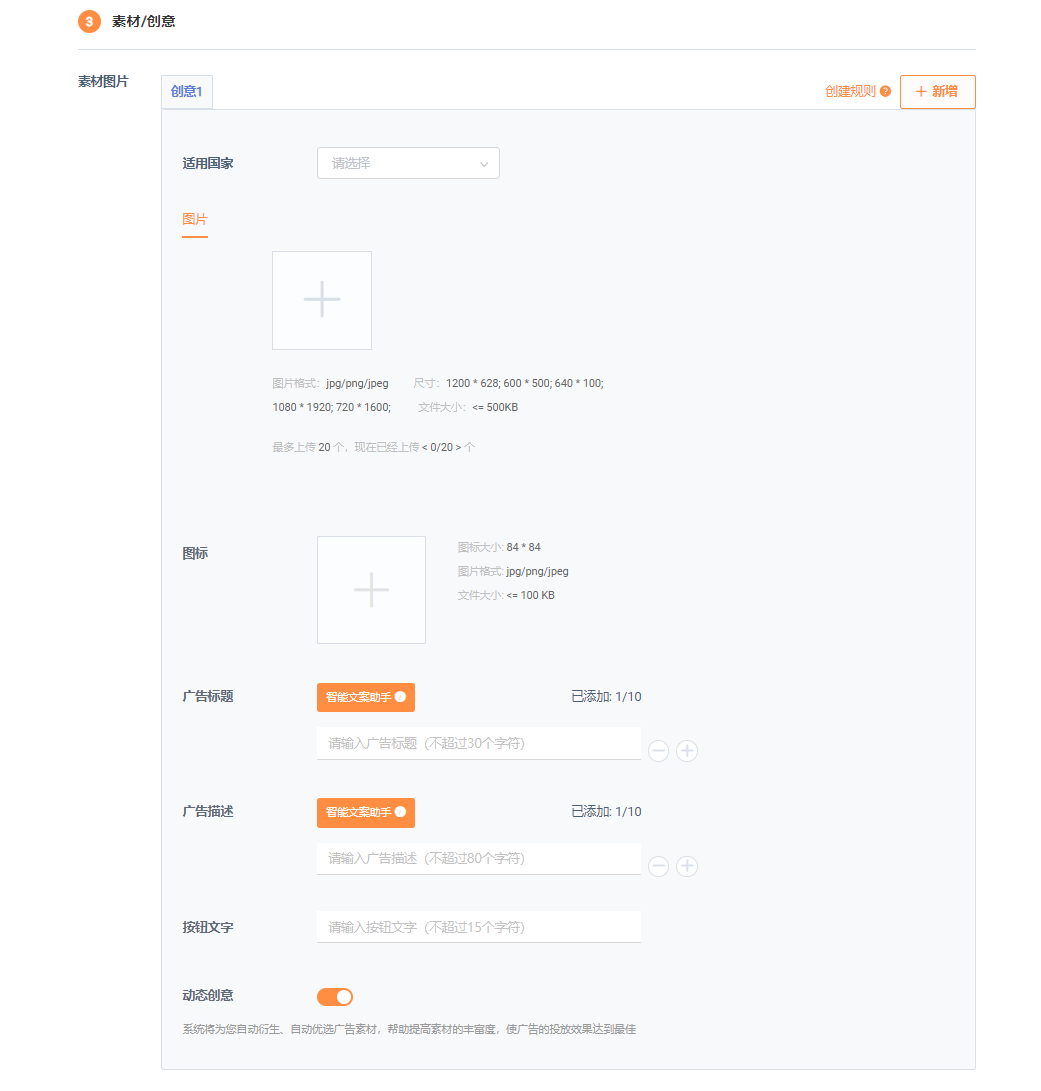
# 3.1.2.3. Media/Ad Creatives
Create corresponding ad creatives, batch upload media, and fill-in miscellaneous information like ad titles for the countries you have selected.
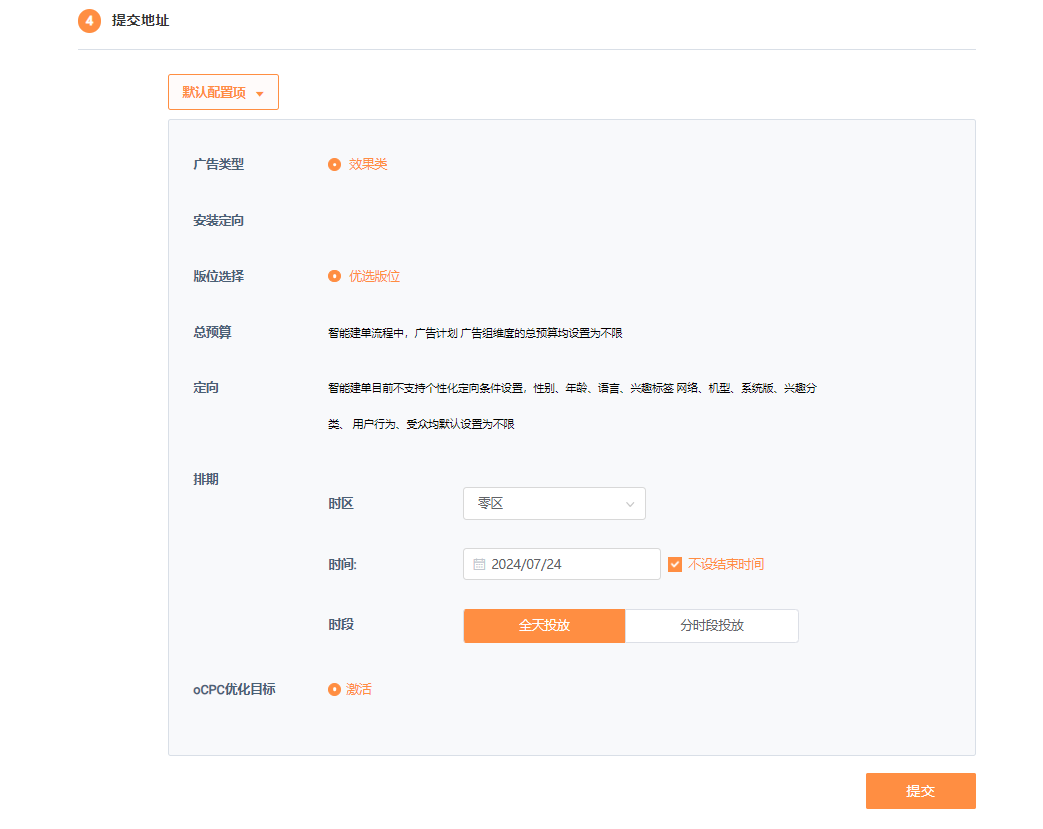
# 3.1.2.4. Provide a URL
Enter the URL that the click leads to, and config it; i.e. ad type, installation targeting, etc.
# 3.2. Ad Review
After the ad is created, it will be sent to the ad management page. After the ad group and ad creative are created, they need to be manually submitted for review.
# 3.2.1. Review Submission
Once created, you will see that the ad group/creative has the status of "To be submitted" on the list page. Click the review button next to "Review Status" to submit it for review. Its status will change to "Under review". Reminder: Once the ad group/creative has been created, you need to manually submit for review, otherwise its status will remain as "To be submitted".
# 3.2.2. Review Duration
Same as the time for the account review, the ad review time is from Monday to Friday. Ads submitted during working days will be reviewed before 18:30 Beijing time during the period. For assistance, please contact the sales team.All content in an ad will be subjected to review, including but not limited to titles, descriptions, keywords, goals, all images and videos. Your ad may not be approved if the landing page content is not fully functional, does not match the advertised product or service, or does not fully comply with our advertising policies.
Our advertising policy: Advertising Policies of Xiaomi_V.1.0.pdf - Lark Cloud Documents (mioffice.cn)
# 3.2.3. Check Review Results
The results of the review and the reasons for rejection will be shown in the review status column under ad management. If an ad has not been distributed, you may hover your cursor over its⚠️icon to see the reasons. If the distribute button for the ad is switched on, once it passes review, it would auto-distribute.
# 3.3. Key Ad List Features
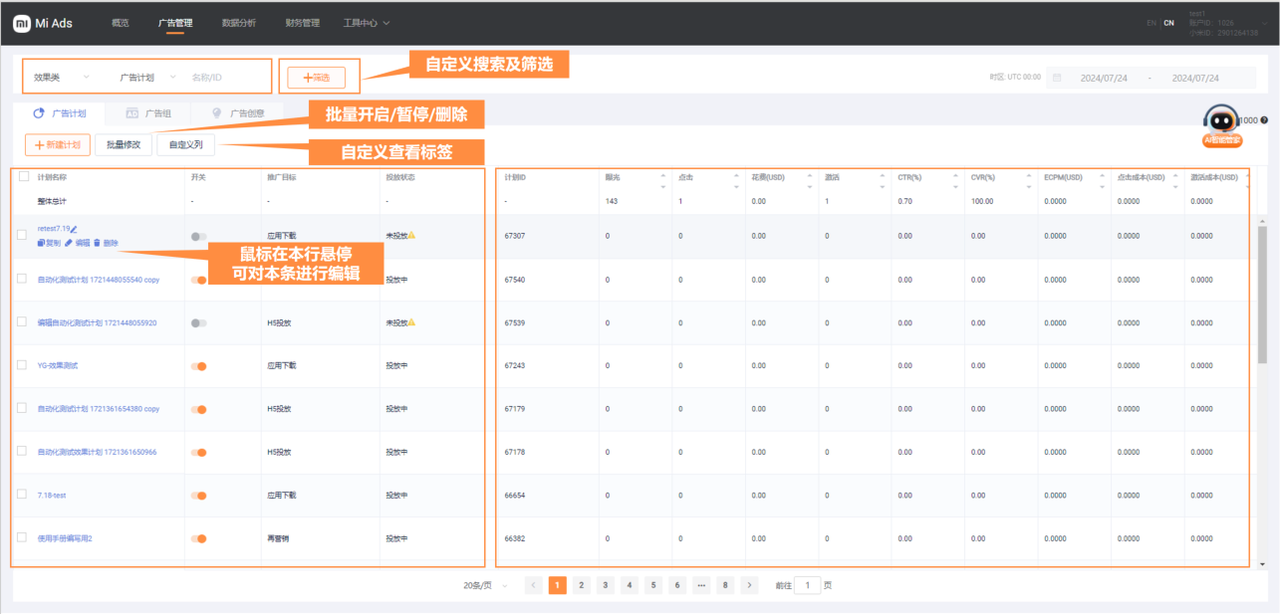
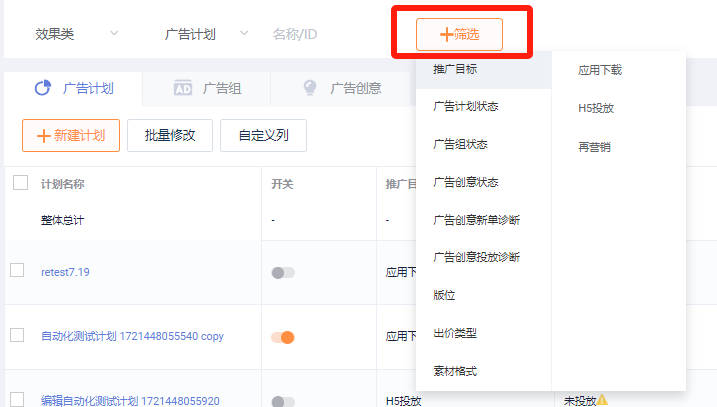
- Search and filter: Quickly filter and find desired ads based on promotion goals, ad status, placement, etc.
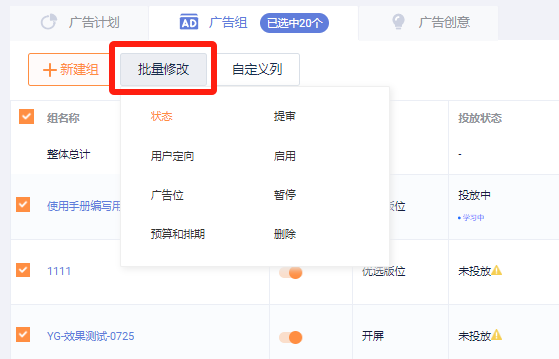
- Batch operation: After checking the ad campaign (group/creative), you can start/pause or delete ads in batches
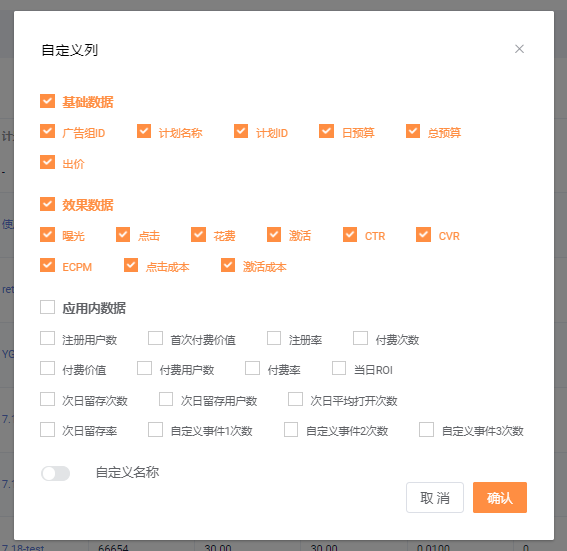
- Custom columns: Display more metrics data in a list, including basic data, in-app data, and video data
- List operations - edit, copy, delete

① Edit: Edit ad information (some information cannot be changed on the edit page)
- Note that an ad group will have to go through review again if any of the following has been changed:
App package name, distribution region, push media, and any changes to any ad creatives information (except for ad creative name).
② Copy:
Quick copy: Fill-in exact same contents, which all could be edited.
Copy and create: Create an exact same campaign/ad group/ad creative, including the items under it.
E.g. when you copy a campaign, the ad groups and ad creatives under it will be copied and created too.
③ Delete:
- When you delete an item, all items under it will be deleted too. If a campaign is deleted, the corresponding ad groups and creatives under the campaign will also be deleted.
④ Quick edit:
- To edit an ad group's or ad creative's name, budget, or bid, hover your cursor over it, then click the ✏️icon on the right.
Note: The cost generated by the deleted ad group/creative will still be reflected in the cost data of the previous level and the data report page.
# 4. Data Analysis
On this page, you can see the distribution data of the account in different dimensions, track daily data, perform accounting verification, etc. You may also download queried reports.
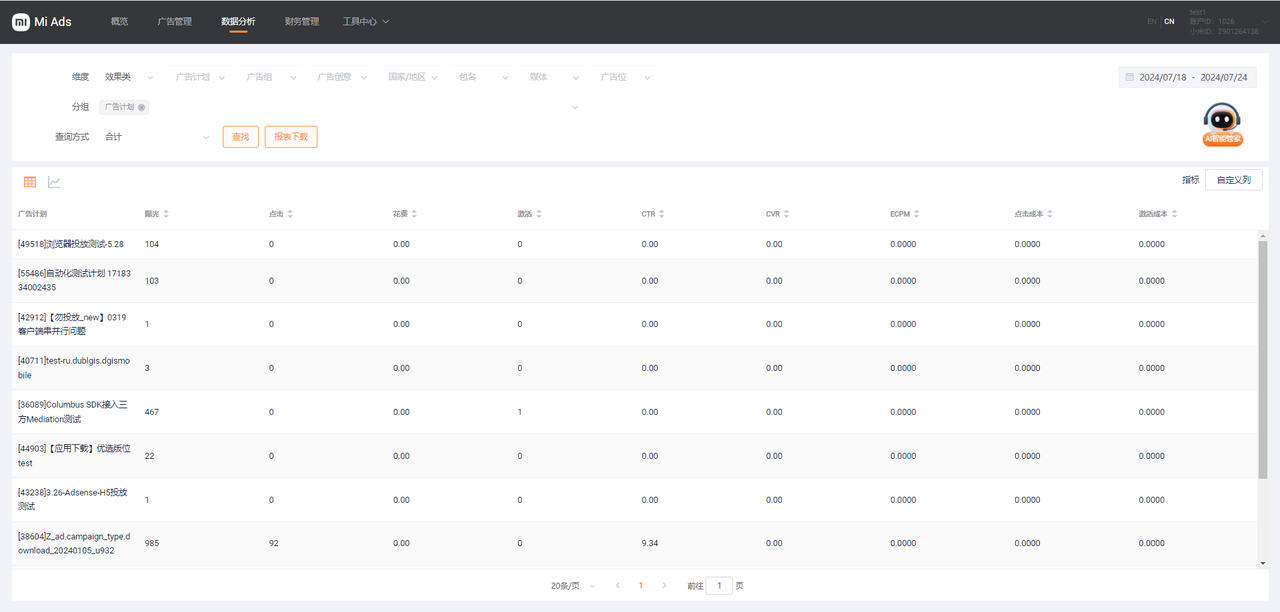
- Dimensional filters: Performance or brand, campaign/ad group/ad creative, country/region, package name, media, placement
- Dimensional groups: Campaign/ad group/ad creative, country/region, placement, media, secondary agency ID list
- Query method: Total, date, hour (refreshed in real-time)
- Statistical metrics: Basic performance data (impressions, clicks, cost, conversions, etc.); in-app data, video playback data (can be viewed by customizing columns)
# 5. Financial Management

This page records financial information such as transfers in and out of the account.
- Search
- View by transferring in/out
Search by time
Financial information: Date of successful transfer, transfer account ID, transfer agency account, transfer type, transfer amount, operator, and remarks
# 6. Tool Center
# 6.1. Audience Management
In the audience management module, you can create new audience, make custom audience searches, conduct batch operations, etc.
# 6.1.1. Create New Audience
Properly setting up ad audiences to acquire customers has a significant impact on improving acquisition and remarketing performance. Mi Ads currently offers two ways to manage audience -- by ad group upload, and by tags.
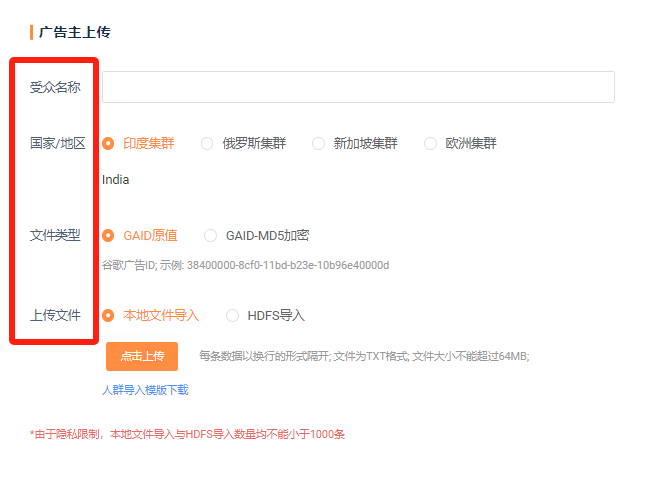
- Advertiser uploading
① Enter audience name
② Set country/region, i.e. Indian cluster, Russian cluster, Singapore cluster, or Europe cluster
③ Set file type, i.e. raw GAID or GAID with MD5 encryption
④ Upload files. Local file import and HDFS import are supported.
Note: Imports have to contain at least 1000 data strings. For local file import, the file should be in TXT format, be no larger than 64MB, and has each data string separated by a newline. For details, please refer to the target import template.
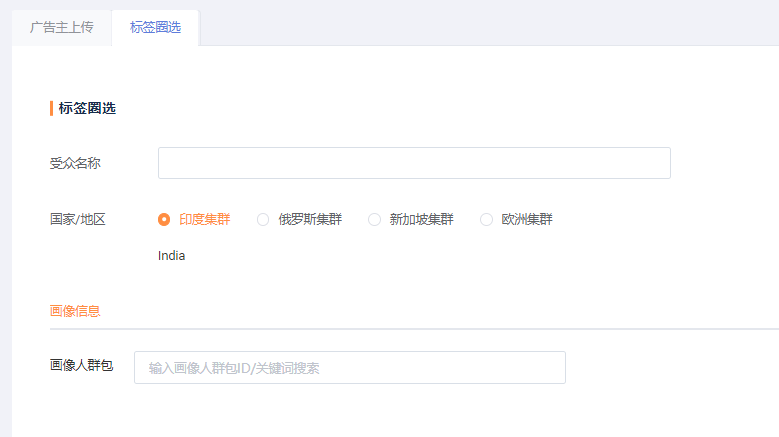
- By Tags
① Enter audience name
② Set country/region, i.e. Indian cluster, Russian cluster, Singapore cluster, or Europe cluster
③ Portrait audience package: Enter package ID/keywords to perform searches
# 6.1.2. Custom Search
- Select country/region
- Select audience type
- Search by audience ID or keywords
# 6.1.3. Batch Delete
- Batch delete: You may tick audience names and delete them in batches
# 6.2. Operation Log
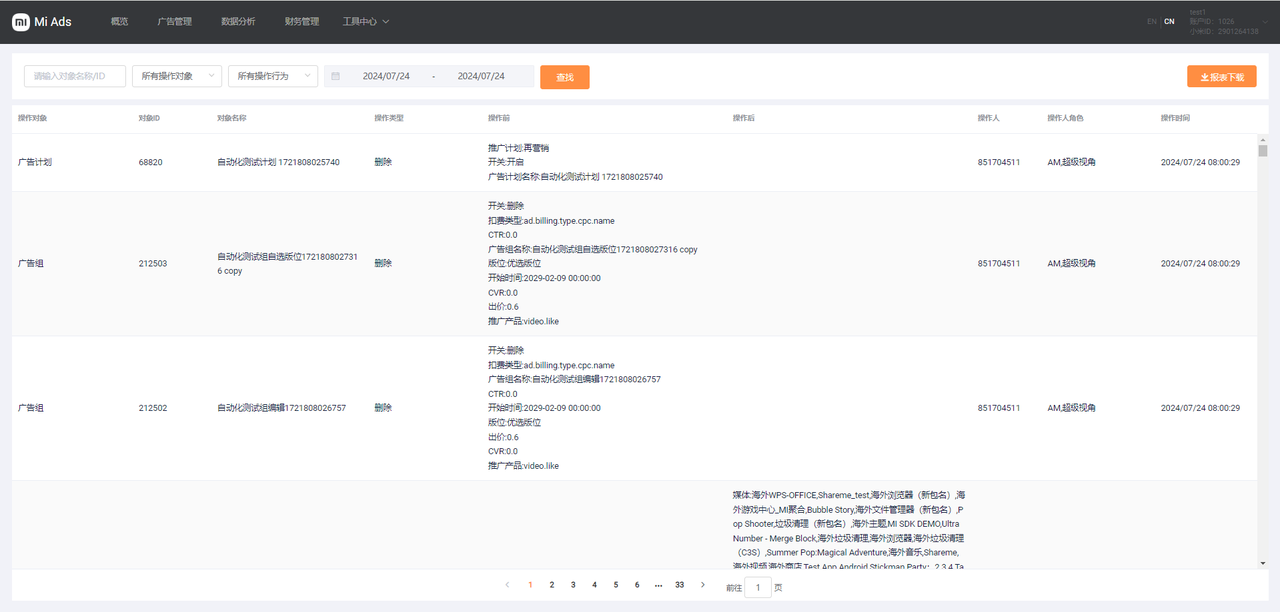
This page logs all operations that happened under the account. It allows you to track down issues. You may also download a log report.
- Custom Search Dimensions
- Search by object name/ID
Search by object (campaign/ad group/ad creative)
Search by operated object (campaign/ad group/ad creative)
Search by time
Log Contents
Operation object, object ID, object name, operation type, status before operation, status after operation, operator, operator role, and operation time
# 6.3. Media Center
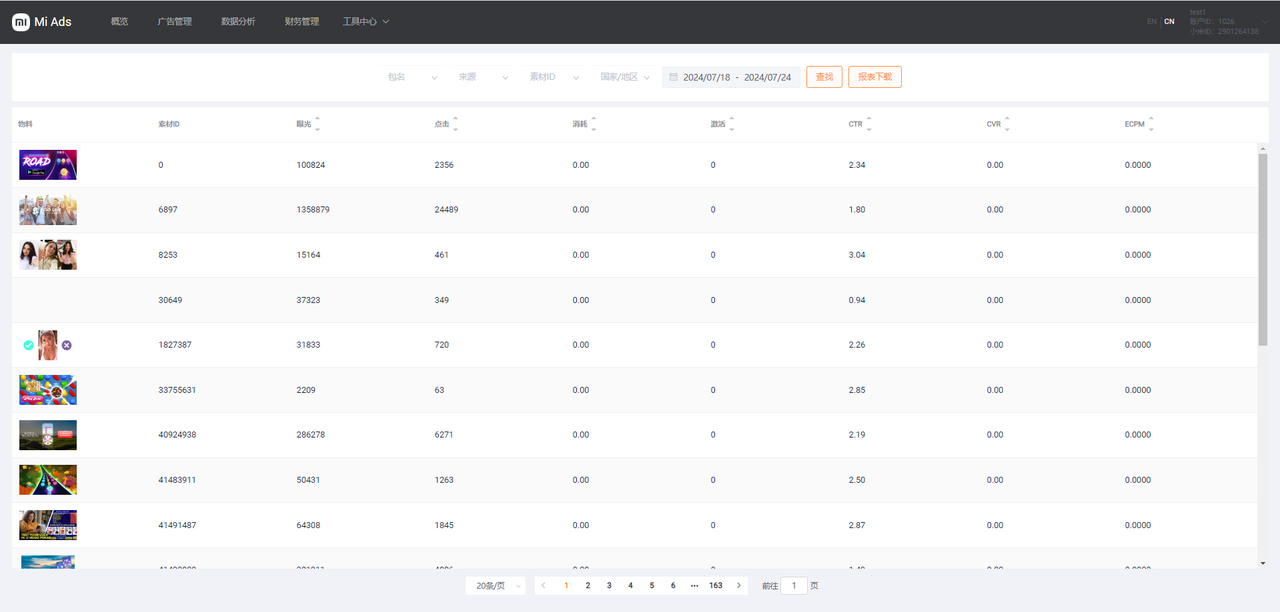
Your media library. Expand your Native ad media library to get accurate recommendation during ad creation.
- Media search dimensions:
- Search by package name
Search by source
Search by media ID
Search by country/region
Filter by time
Media Center contents: Media ID, impressions, clicks, cost, conversions, CTR, CVR, ECPM
# 6.4. Order Management
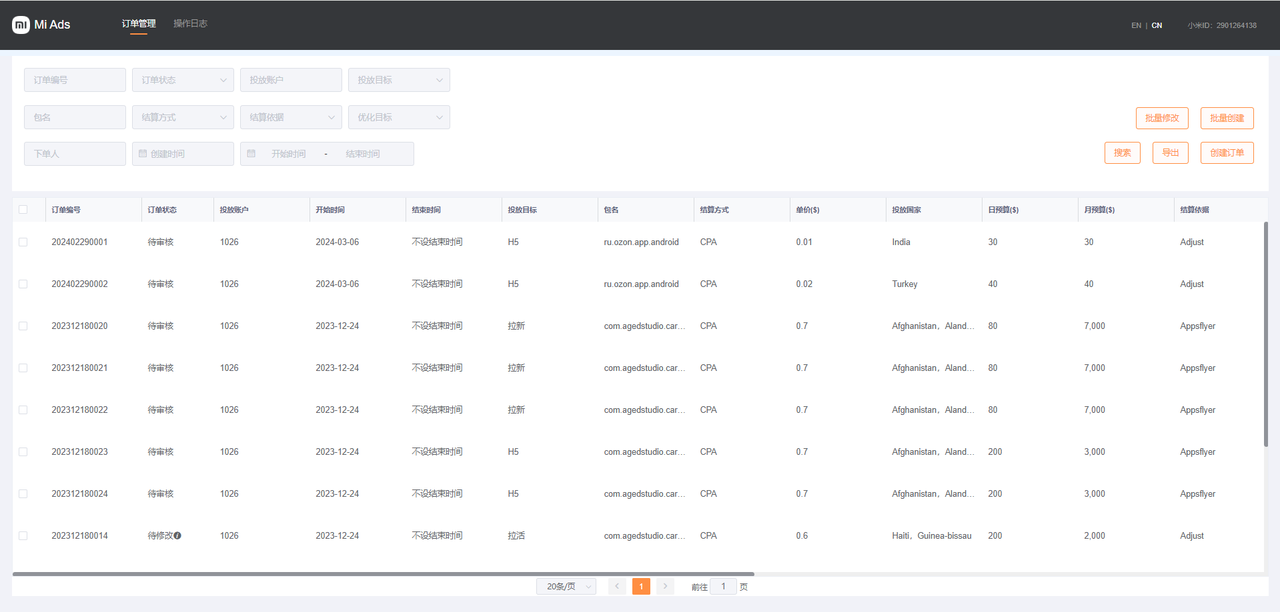
You may use order dimensions to batch edit/create, search, export, create orders, and check the operation log
- Order search dimensions:
- Order number
Order status: Ready for review, ready for issuing, ready for edit, ready for distribution, distribution in progress, distribution paused, distribution ended
Distribution account
Distribution goal: gain new users, H5 distribution, gain active users
Package name
Settlement method: CPA, CPC, CPI, CPM
Basis for settlement: Appsflyer, Adjust, Branch, Singular, Kochava, SVG, Appmetrica, Mytracker, attribution by Xiaomi, others
Optimization goal: Conversion, registration, payment, day 1 retention, in-app access, ROI, character creation, 7-day retention, others
Order creator
Creation time
# 6.5. Asset Center
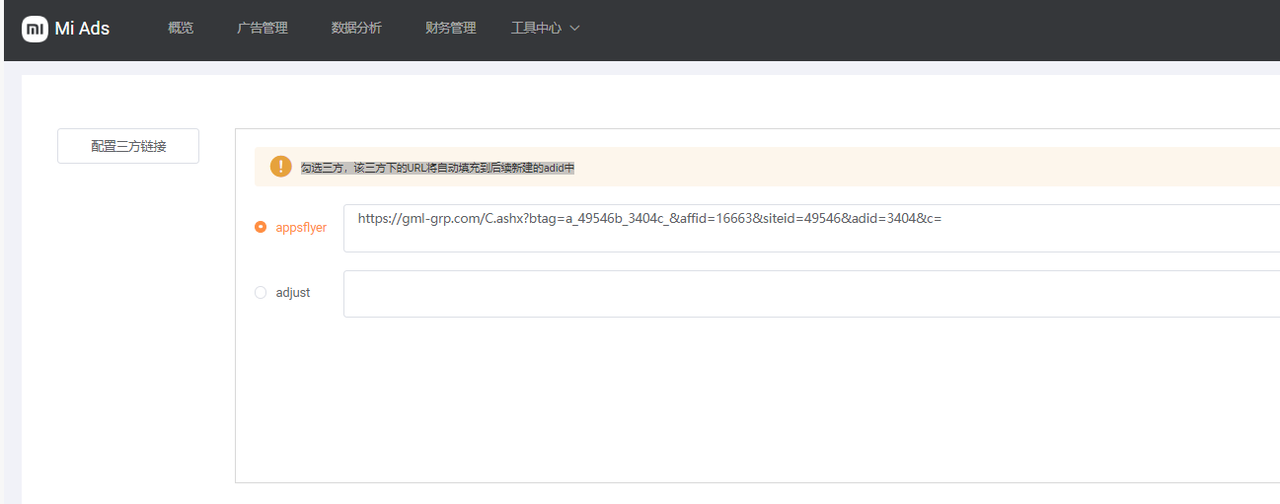
For setting up third-party links. When you tick a third-party item, the URLs under it will auto-fill to subsequent new AdIDs.
# 7. (New) announcement notice
# 7.1. Miads Core agency Operation
# 7.2. Ads Resources
- General resources
- Non-Standard Ad Format
- Introduction of OOBE
- Introduction of PUSH
- Introduction of Lock Screen
- Introduction of Splash